
Image by: Igor Ovsyannykov from Pixabay
Assigning Power Apps per App licenses (2025 Update)
Power Apps per App licenses are a great affordable alternative but, they have to be assigned in a very specific way - different from your regular Microsoft license. (Updated for 2025)

The Power Apps per App licenses work with so called App Passes. A license for any specific app is not directly assigned to a user, rather it’s automatically assigned when a user starts using an app.
First you’ll have to purchase the appropriate licenses for your users. The amount of licenses you buy relates to the amount of users you want to license for each app.
Updated for 2025
This guide has been updated and is current for 2025.
Originally written 9 March 2020
In this article
- How license consumption works (2025)
- Key changes since the inception of this model
- Step-by-step: Assigning Power Apps per App licenses
How license consumption works (2025)
- One license give access to one app (or one portal), per user per environment
- When you share an app (or portal), the license is not yet consumed. As soon as a user launches the app, a license is consumed
- If a user accesses multiple apps or portals, each counts as a separate license consumption and therefor also requires multiple licenses
- License consumption is tracked in the Power Platform admin center under Licensing > Capacity add-ons
- If you remove all per app licenses from an environment, users will lose access to apps unless they have another valid license
Read more about this in the official docs:
Example scenarios
- Scenario 1: 10 users need access to 1 app in 1 environment → Allocate 10 licenses to that environment.
- Scenario 2: 5 users need access to 2 different apps in the same environment → Allocate 10 licenses (each user consumes a license for each app).
- Scenario 3: 20 users need access to 1 portal → Allocate 20 licenses to the environment.
Key changes since the inception of this model
These are the key changes for the Power Apps per App license, compared to their original way of working.
- No more baseline access license: You do not need to assign a baseline license to users, only allocate per app licenses to the environment
- Each license = one app or one portal: The previous model (two apps + one portal) no longer applies for any new purchased licenses
Step-by-step: Assigning Power Apps per App licenses
1. Purchase licenses
Buy Power Apps per App licenses through your Microsoft Partner or license distributor. They will be able to offer you the best deal on your license in terms of costs.
If you are a direct customer of Microsoft, you can also purchase the license through the Microsoft 365 admin center, but this will generally be more expensive.
2. Allocate licenses to environments
Licenses are not assigned to individual users. Instead, you allocate them to the environment where your app resides:
- Go to the Power Platform admin center.
- In the navigation pane, select Licensing.
- Under Capacity add-ons, find your per app licenses and click Manage.
- Allocate the desired number of licenses to each environment.
Tip
If you have multiple environments (e.g., test, production), allocate licenses to each as needed.

3. Enable per app licensing for your app
This procedure is different for Canvas Apps, Model-Driven Apps and Power Pages portals.
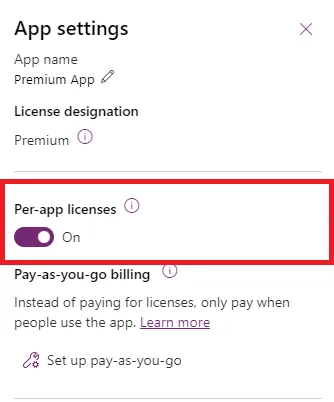
Canvas Apps
This setting defaults to On for apps created after 1 October 2020, for older apps you will need to explicitly turn this on.
- Open the Power Apps Maker Portal
- Make sure you’re in the right environment
- Select your app, then go to Settings
- Under Per-app licensing, toggle Auto assign per app passes to On
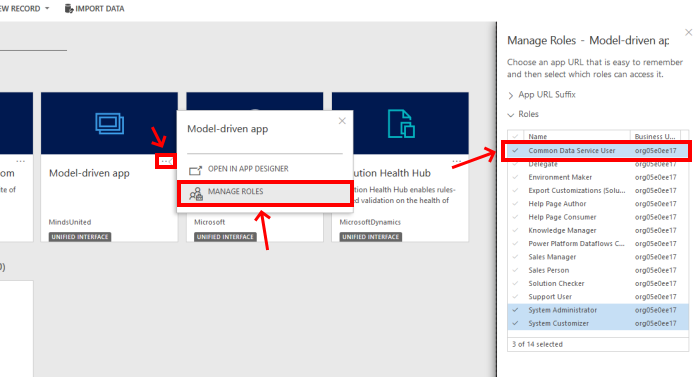
Model-Driven Apps
Per app licensing is always turned On for Model-Driven apps and cannot be turned off.
User access is determined as usual, as long as the user has access to the app (as defined through Security Roles) they will be able to open the app. Any user that opens an app will consume a license.
To allow users to open a specific app, configure the Security Roles to allow opening that specific app. Or to prevent it, make sure users do not have a Security Role that gives them access to the app.
Associating Security Roles with Model-Driven Apps is done though the My Apps screen (also known as the App Switcher page)
- Navigate to https://
orgname.crmX.dynamics.com/apps - Select the
...in the app’s tile - Select Manage Roles
- Assign/unassign the Security Roles you want to grant access to this specific app
Power Pages portals
Per app licensing is always turned On for Power Pages portals and cannot be turned off. User access
For access to a Portal app, you will have to enable Entra ID sign in (previously: Azure AD) for the Portal (enabled by default) and ask your users to use the Enta ID (or Azure AD) button to sign in on the portal.
After they’ve signed in for the first time a Contact record will be created, you’ll have to assign the appropriate Web Roles to that user using the Portal Management app.
4. Share the app
Share your app with users or groups as usual. When a user launches the app, a license is consumed from the environment’s allotment.
- For model-driven apps, assign the appropriate security role to users
- For canvas apps, share the app directly with users or groups